ClojureScript Test Setup
This post will walk through how to setup a Test Toolchain from scratch for a
ClojureScript app.
Create a Project
Start by creating a basic ClojureScript app. The easiest way to do this is by following my templates projects Quickstart guide.
Assuming you're using the templates tool from above, you would run the
command in the quickstart guide and you should have a project called my-app-name
which has the following folder structure:
my-app-name
├── README.md
├── deps.edn
├── dev.cljs.edn
├── prod.cljs.edn
├── resources
│   └── public
│       ├── index.html
│       └── style.css
├── src
│   └── myusername
│       └── my_app_name.cljs
└── test
    └── myusername
        └── my_app_name.cljs
Now, move into the project you just created
cd my-app-name
Install the project's JS dependencies
yarn install
Now let's make sure everything is working as expected by running the following command:
clj -M:dev
If everything worked, a new browser window should automatically open to
http://localhost:9500/ and you should see the following:
I now want to draw your attention to the names of the file and folders:
├── src
│   └── myusername
│       └── my_app_name.cljs
└── test
    └── myusername
        └── my_app_name_test.cljs # <--- notice the `_test`
It's a convention in Clojure to have your tests mirror your src
directory structure. Additionally, when you name the actual files containing
your tests they get suffixed with _test.
Write a Test
Now that we have a project to work in, let's write some code and test it!
Open my_app_name.cljs. You will notice that some code already exists in this
file. Delete all the code in the file. Type the following into the file:
(ns myusername.my-app-name)

(defn add
  [a b]
  (+ a b))
The above is just a simple function which we've written so we have something to test with. The next step is to write our first test.
Open my_app_name_test.cljs. Delete all the code in the file. Type the following
into the file.
(ns myusername.my-app-name-test
  (:require
    [cljs.test              :refer-macros [deftest is]]
    [myusername.my-app-name :as my-app-name]))

(deftest test-add-function
  (is (= (my-app-name/add 1 1) 2)))
Let's review the test we just wrote. cljs.test is a small library with
everything you need to test ClojureScript code. Among other things,
it comes with:
- Test Decleration Utils e.g.
deftestdeftestlet's us define a test. In our example, we defined a test calledtest-add-function.
- Test Assertion Library e.g.
isisis a convenience wrapper around atry-catchblock
- Test Runner
- we haven't introduced this to you yet, but it's called
run-tests
- we haven't introduced this to you yet, but it's called
Now that we have written a test, the next section will show you how to run the test.
Run tests with cljs-main
To run our tests, we need to create a namespace that will import all of our
tests and then run them. We can refer to this namespace as our test_runner,
but you can also think of it as the test entrypoint.
Start by creating a new file in test/myusername. Call this file
test_runner.cljs. Open test_runner.cljs and type the following into it:
(ns myusername.test-runner
  (:require
    [cljs.test :refer-macros [run-tests]]
    [myusername.my-app-name-test]))

(run-tests 'myusername.my-app-name-test)
What the above does is:
- Import our test namespaces e.g.
myusername.my-app-name-test - Run all of our rests by calling
run-tests
Now that we have a file which knows how to run our tests, we need a command in our app which we call to run the tests.
Open the deps.edn file. Type the following new alias into the file:
{
;; ...

:test {:main-opts ["--main"    "cljs.main"
                   "--compile" "myusername.test_runner"
                   "--repl"]}}
From here, we just have to run the tests. To do this, go to your terminal and run the test alias:
clj -M:test
What the above alias is going to do is:
- compile your
cljstojs - automatically open your app in your default browser
- render the default ClojureScript
index.html - run the tests in the browser
But you will notice that you won't see the tests anywhere. So, what happened?
Your test report or output won't be found in the browser, rather, you will
find it in your terminal and will look something like this:
➜ clj -M:test
ClojureScript 1.11.60
cljs.user=>
Testing myusername.my-app-name-test

Ran 1 tests containing 1 assertions.
0 failures, 0 errors.
Note that you could also have the test report displayed in your browser
console by adding (enable-console-print!) in your test-runner namespace
before you invoke run-tests:
(ns myusername.test-runner
  (:require
    [cljs.test :refer-macros [run-tests]]
    [myusername.my-app-name-test]))

(enable-console-print!) ; new

(run-tests 'myusername.my-app-name-test)
Cancel out of the clj -M:test process in your terminal. Run clj -M:test
again. Check the browser console and you should see the tests logged there
as well.
Note that it's pretty cumbersome to have to stop and re-run tests all the time.
Instead, we can tell ClojureScript to watch the src and test directory so
that every time you update files in your src or test dir they will
automatically be recompiled on save. To make this happen, update your
:test alias to look like this:
{:test {:main-opts ["-m"  "cljs.main"
                    "-w"  "src:test" ; new
                    "-c"  "myusername.test_runner"
                    "-r"]}}
And that's everything involved in setting up a ClojureScript only Test Toolchain. For those who want to take it a step further, let's see how we can
configure figwheel to run these tests.
Run tests with figwheel
Because we are using the templates reagent template, we have everything we
need to run our tests using figwheel. In fact, most everything we needed from
the previous section will be used in this section with a few changes. As you
will see, one awesome feature of using figwheel for testing is you get more
tooling, with less configuration.
To recap, we already have:
- A
test - A
test runner
The only thing we have to change is a small piece of our test runner. Open up
test_runner.cljs and update the following
(ns myusername.test-runner
  (:require
    [cljs-test-display.core] ; new
    [figwheel.main.testing :refer-macros [run-tests]] ; new
    [myusername.my-app-name-test]))

(run-tests (cljs-test-display.core/init! "app-testing")) ; updated
The next step is to open your dev.cljs.edn file and add a :extra-main-files key set like this:
^{:auto-bundle      :webpack
  :watch-dirs       ["src" "test"] ; updated
  :css-dirs         ["resources"]
  :extra-main-files {:testing {:main myusername.test-runner}}}; new
{:main myusername.my-app-name}
What the above does is build and run your tests, like we did with the :test
alias in the previous section.
The difference is that we are going to do this as part of our :dev alias.
This is great because it means we have a single file watcher and HMR process
runing in the same process as our development build. So now, we can develop
our app and tests at the same time in one simple command.
To run the above:
clj -M:dev
Now you can visit your app at http://localhost:9500 and your tests at
http://localhost:9500/figwheel-extra-main/testing
When you visit localhost:9500/figwheel-extra-main/testing you should see
something like this:
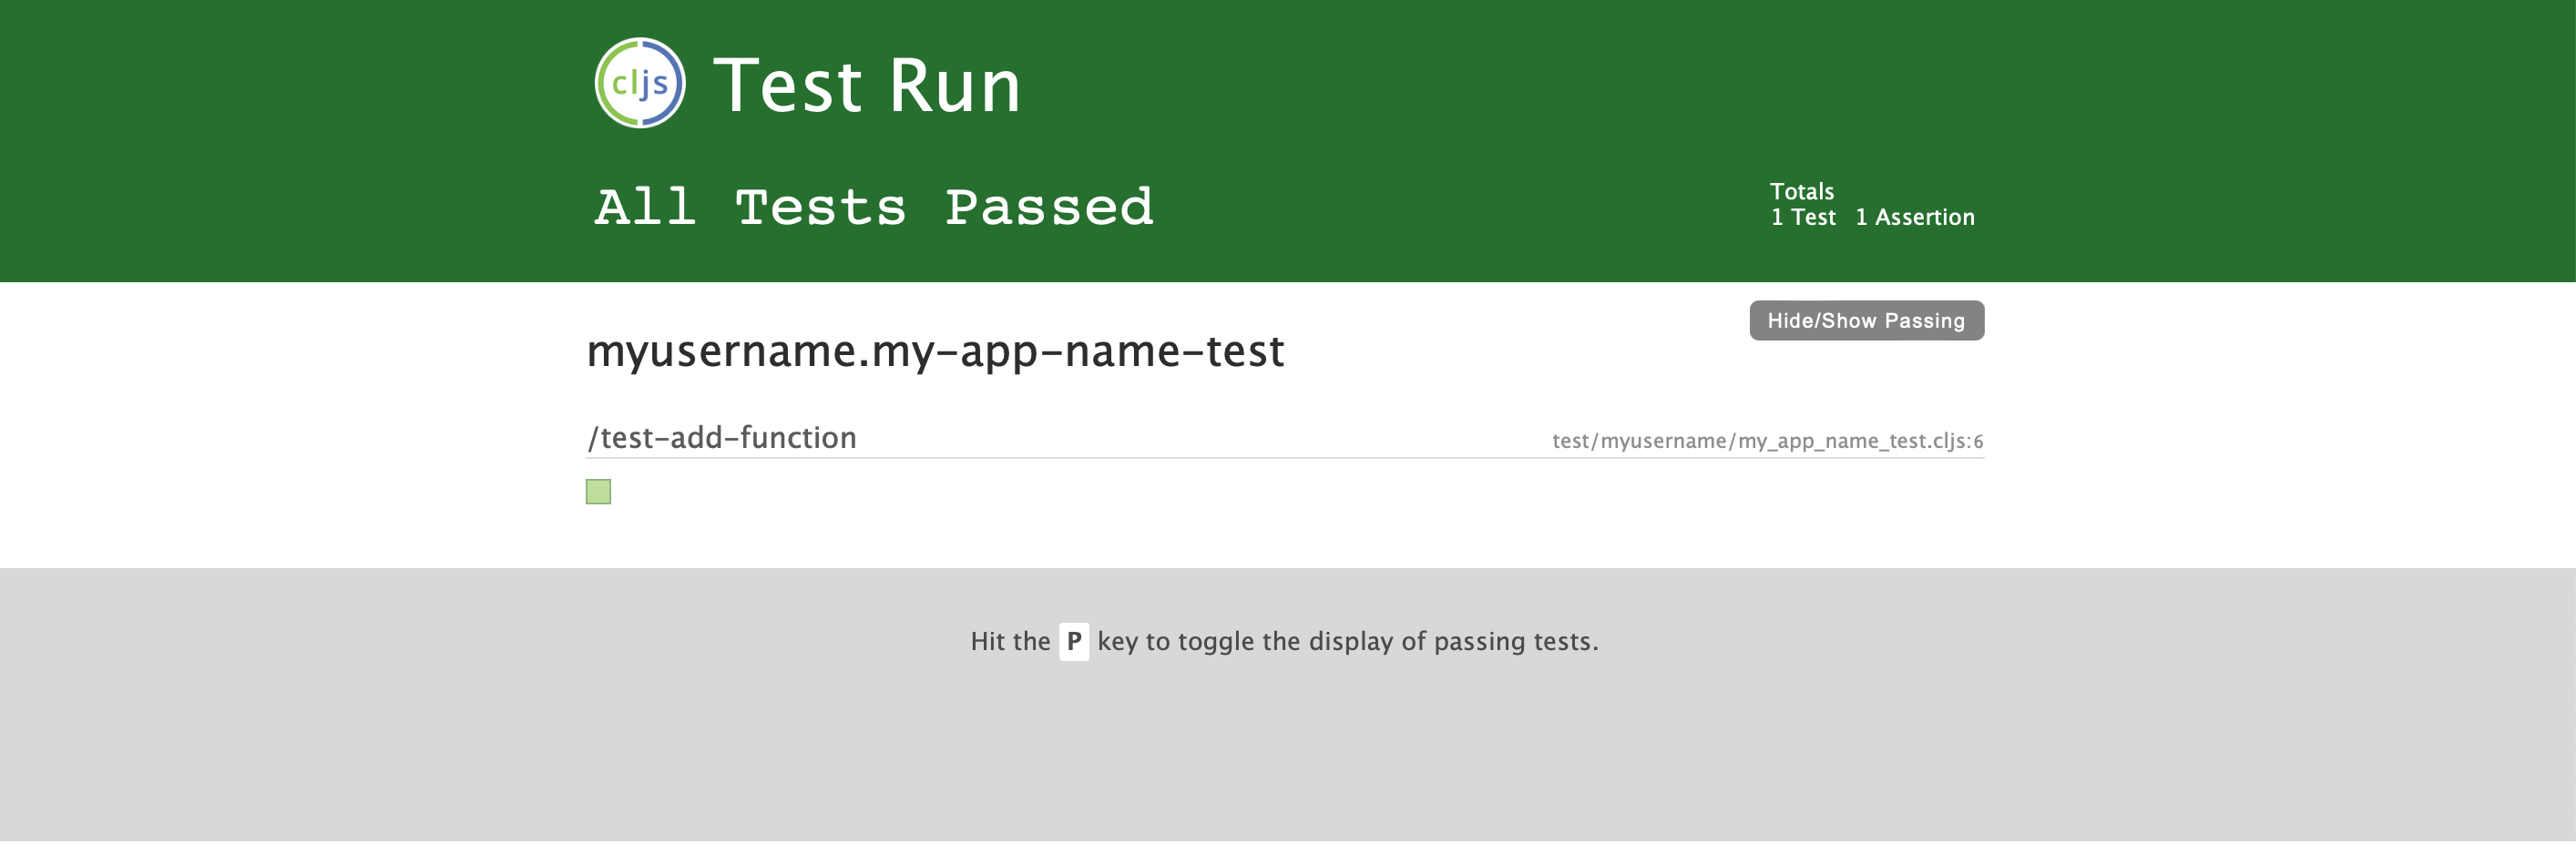
The above is a graphical version of the textual test report that we got when
we ran the tests using cljs.test. From here, you can modify your code and
your figwheel-extra-main/testing will not only rebuild, but live update
creating a nice developer experience.
Runtime Environments
Up until now, we haven't discussed Runtime Environments. Runtime Environments
are important because they impact your test results.
When we ask which runtime environment our JS code is running in we want to know
if it's running in a browser or server environment. Then, we also need to know
which browser (Safari, Chrome, Firefox) or server environment (Node, Dino, Bun)
our code is specifically running in.
Right now, if you run your code like we did in the run tests with cljs.main
section, your code will be run in a Browser Environment. If you were to set
--repl-env to node then your code would be run in a Node Environment.
Making sure we're testing against the right environments is important because the behavior and APIs made available to you will change based on the environment your code's run in.
For example, you won't have the window object in Node, so it wouldn't be a
good idea to test your browser code in a Node server environment.
Another consideration is test performance. As it turns out, it's not always
desirable or possible to test your browser code directly in the browser. For
example, you may run into a scenario where you want to run your code in your
CI/CD process. When this is the case, you will want to
setup a Headless Browser Runtime Environment. The following section will
show you how to do this.
Headless Browser Runtime Environment
This section is going to illustrate how to run your ClojureScript tests using headless chrome.
This is something we want to configure so we can run our tests as part of our CI/CD process.
The reason we do this is because in CI/CD we don't need a browser GUI. The GUI is slow and uses more computer resources. For this reason, we configure our tests to run in a headless environment. Here are some example of headless JS environments
For our purposes I use headless chrome which is Chrome without the GUI.
The following sub-sections will walk through the steps required to setup this environment and teach figwheel to execute your tests inside of it.
Step 1 Setup A Headless Test Runner
Open test_runner.cljs. Make it match the following:
(ns myusername.test-runner
  (:require
    [figwheel.main.testing :refer-macros [run-tests-async]]
    ; tests here
    [myusername.my-app-name-test]))

(defn -main [& args]
  (run-tests-async 10000))
Step 2 Add a test config
Create a new file in the root of my-app-name called test.headless.cljs.edn. Open
test.headless.cljs.edn and type the following into it:
^{:auto-bundle         :webpack
  :ring-server-options {:port 9504}}
{:main            myusername.test-runner
 :infer-externs   true
 :output-dir      "target/public/cljs-out"
 :output-to       "target/public/cljs-out/main.js"
Step 3 Configure Figwheel
Open deps.edn and add a :test-headless alias:
{:paths
 ["src" "test" "resources" "target"]

 :deps
 {org.clojure/clojurescript  {:mvn/version "1.11.60"}

  com.bhauman/figwheel-main  {:mvn/version "0.2.18"}

  reagent                    {:mvn/version "1.2.0"}}

 :aliases
 {:dev
  {:main-opts ["-m"  "figwheel.main" "--build" "dev" "--repl"]}

  :test-headless ; new alias
  {:main-opts ["--main"         "figwheel.main"
               "--compile-opts" "test.headless.cljs.edn"
               "--fw-opts"      "{:launch-js [\"/Applications/Google Chrome.app/Contents/MacOS/Google Chrome\" \"--headless\" \"--remote-debugging-port=9222\" :open-url]}"
               "--main"         "myusername.test-runner"]}}}
That's it. We are ready to run our headless browser testing setup. Try it out
by running clj -M:test-headless in your terminal.
If it all worked you should see something like this:
# ...

Testing myusername.my-app-name-test

Ran 1 tests containing 1 assertions.
0 failures, 0 errors.
:figwheel.main.testing/success
You're going to notice that you have to re-run this every time you want to run
your headless tests. This is to be expected. The thing with this approach is
that we have only really configured it to be run by our CI environment and also
as a quick sanity check for newcomers to our project. Could we make it do
more? Yup! You can take this and connect it to figwheel's file watching
mechanism and have it behave exactly like the browser testing setup.
Alternative Tools
Up until now, i've shown you only cljs.test. The reason is because it's simple,
does what we need and means we don't have to pull in more deps.
Having said this, you might want more features. That's totally understandable
and possible with this setup. Part of the reason I broke down cljs.test
into smaller groups of functionality like assertion library, test definitions,
test reporting and test runner is because it helps you see that you're not
looking to replace everything, but maybe just a small piece of something.
Now that we know what some of these pieces are you should be in a position to replace them if you need to. With this in mind, here are some alternatives you can consider if you want to experiment with different tools.
To replace your assertion libraries and test definitions these are some popular libraries in Clojure(Script)
For now I recommend sticking with cljs.test and then look into one of the
above when/if the need arises.
And replacements for test-runners and test reporters
Next Steps
The goal here was to layout some context. Point you to tools and explore how and what to configure in your tooling for testing ClojureScript. From here, play with the setup, see how far it takes you and run with it. Here are some other resources you might be interested in:
Finally, there is no "right" or "wrong" testing tool. Start. Figure out what works and what doesn't work and then iterate.